3 STEPS TO A FABULOUS GALLERY WALL
Unless you are one that opts for a minimal, clean and totally streamlined interior, you may be naturally attracted to the gallery wall. I have to say that generally speaking, many of my clients have absolutely loved the idea of creating a personalised gallery wall. It’s a great way to showcase your favourite pieces as well as incorporate some eclectic flavour amongst the personal.
There is an art to creating a gallery wall, so let me break down how I do this.
Step 1. Develop your unique story.
This is the hardest [but also most enjoyable] part. Don’t think too hard about this. The main thing is that you choose a wall that can accommodate a number of pictures or artworks, and then have the pieces to add in. Once you have the area and know roughly what space you have to work with, you can choose the pieces that will make your wall come alive.

Designer: Adam Scougall Photographer: Yie Sandison
The above image is of a project we completed a few years ago. The gallery wall pictured here showed the clients personal images reframed and added in with other stock images that inspired the mood. The thing that worked here is the complete coverage of the wall with multiple sized frames.
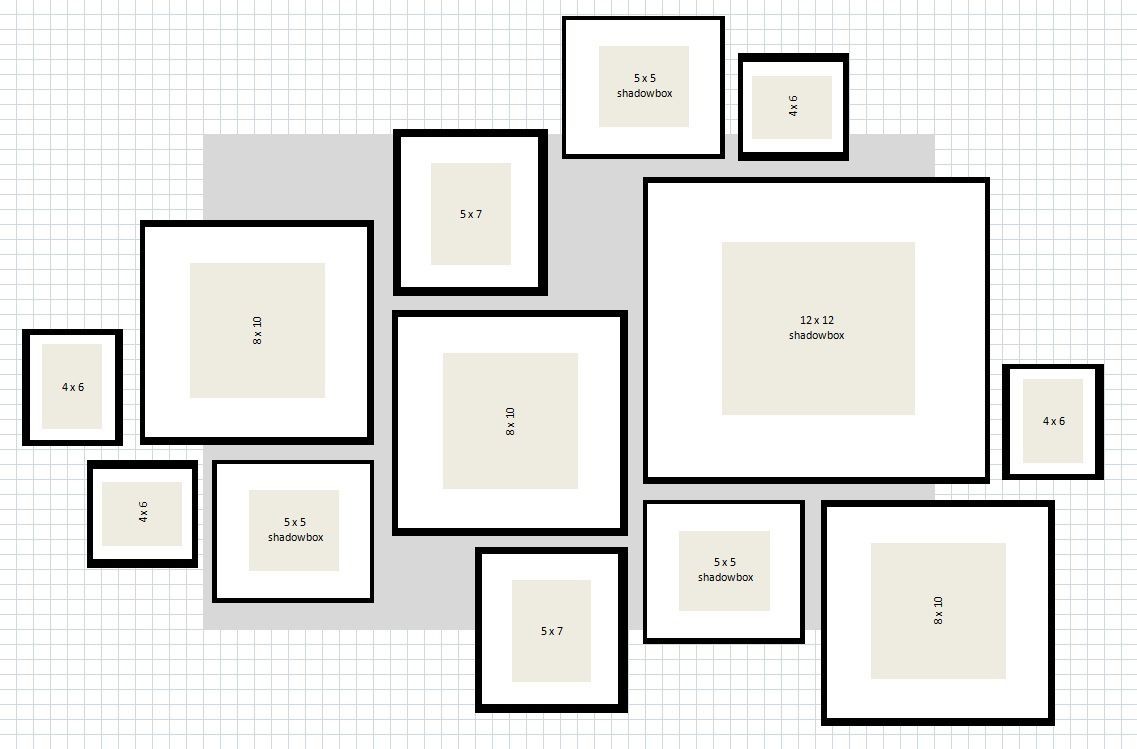
Step 2. Create a template
Work out the area [width by height] and allow enough breathing space between each frame. I could give you a distance, but it really changes in every scenario, and will more or less resolve itself once you complete your template exercise.
How to do this? Lay the images out on the floor. Play around and then soon enough, your will get your template formation organised.
This exercise should be as freeing as you can allow it to be. Perfection isn’t what’s important. the visual mishmash of different frames and objects is tremendously interesting once you start to piece this all together. Don’t be afraid of mixing frame styles. Let photographs as well as abstract art mesh with one another. This should be a talking point at dinner parties and get togethers with family!
The below image of a dining room with beautiful navy walls is complemented with the chic gallery wall. In this instance, the repetition of the black frames with simple white mats work wonderfully well. The sepia tones in many of the images inside the frames communicate a consistency in the overall look & feel and make an interesting statement in a room designed for conversation.

Image courtesy of Chango & Co Interior Designers: Chango & Co
The below gallery wall is by American Designer Jeffrey Alan Marks [pictured]. I love how Jeffrey has installed the many various frames in varying styles and expertly pulled off an interesting and curated look. There are also objects mounted in between the frames that show us the value of mixing things up a little1. It would be great to walk up the stairs with a glass of red and catch your eye on an interesting image. Look we have also have rope for support!

Image courtesy of Jeffrey Alan Marks.
Step 3. Pay a professional picture hanger
It might be ok to knock up a couple of smaller pieces on your own, but when dealing with multiple sizes and [sometimes] large areas the fastest and most effective way to ensure these are hung properly is by hiring a professional hanger. If you are trying to do this in a stairwell [like Jeffrey has] it’s too much a risk of injury to DIY, so consider safety here. The gallery wall is not something you are likely to want to change for some time, so invest a few dollars in a trade who specialises in getting the look right as well as insuring the multiple pieces are stable and are hung to last.
AS